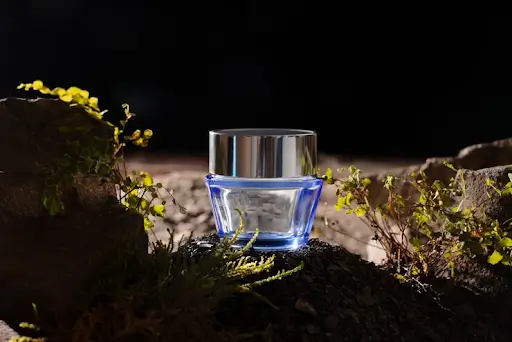
Ever wondered how photographers make a still object look alive without even moving it? That’s all due to long exposure. But what does that really mean? Long exposure in product photography means keeping the camera’s shutter open for an extended time to capture light and motion in a single frame. This technique brings an entirely new dimension, letting reflections and highlights interact with your subject in ways that conventional setups simply can’t achieve.
But how to do long exposure, and what techniques should you follow to make your products pop? Let’s discuss those in this blog!
Essential Gear And Setup
- Camera and Lens Considerations – A camera with manual settings lets you control shutter speed, aperture, and ISO. Use a lens with good sharpness and minimal distortion so the product stays crisp even with creative effects.
- Tripods & Stabilization – A strong tripod is non-negotiable for long exposures. Even the slightest shake can blur the product, so avoid lightweight, unstable models.
- Filters (ND Filters in Particular) – Neutral density (ND) filters cut down excess light, making it possible to use slow shutter speeds even in bright conditions. They give you flexibility without overexposing and help beginners better understand what is exposure in photography and how different light levels affect the final image.
- Remote Shutter & Tethering Tools – Triggering the camera remotely or tethering it to a laptop prevents vibrations from pressing the button. Tethering also lets you preview results instantly on a larger screen.
Long Exposure Techniques For Still Life
Light Painting
Start by turning off all ambient lights and using a flashlight, LED stick, or sparkler as a “brush” to paint around or on your subject. Set your camera to a long exposure mode and keep it on a tripod. Move the light deliberately around the product to highlight contours, add streaks, or create patterns. Remember, the trick is to avoid spilling light directly onto the lens; instead, focus on illuminating specific areas of your composition. Experiment with different colored lights to add a dramatic flair and adjust exposure time depending on how much detail you want to capture.
Motion Blur Around The Product
Instead of moving light, here you use moving props. Let’s say you’re photographing a glass of wine, set up a tripod so the glass is locked sharp. Then, while the shutter is open, wave a thin piece of fabric or swirl smoke nearby. The blur will capture motion in the surroundings while the wine glass remains perfectly crisp. This technique is great when you want your product to appear calm and steady while the world around it feels alive.
Spinning Light Sources
Try tying a glow stick or small LED light to a string and spinning it in circles around your still-life subject. Use a shutter speed of 15–30 seconds to let the trails build. The circles or spirals create a time-tunnel effect, almost as if your product is being pulled through another dimension. Keep the product lit separately (a desk lamp or soft LED pointed at it works fine) so it doesn’t disappear into the trails.
Reflection And Glass Tricks
This method uses surfaces, not moving props. Place your subject on a reflective sheet, like black acrylic or glass. Angle another piece of glass behind it at a tilt, then shine a soft light across the setup while the camera is exposing. The reflections will multiply and stretch, creating futuristic patterns that make one product look like many. It’s a way to add complexity without adding actual motion.
Double Or Multiple Exposures
Some cameras let you take more than one photo and combine them into a single frame. Try shooting your product sharp in the first exposure, then in the second one, introduce light trails or movement. The camera blends both together, so you get the clarity of the product plus the dynamism of time-bending effects. For example, you could photograph a perfume bottle normally in the first shot, then in the second, wave a small LED light around it. The final image will show a crisp bottle wrapped in glowing light trails. If your camera doesn’t support this, you can replicate it by merging images in editing software.
Water And Smoke Effects
Set a product against a dark background and release a little dry ice vapor, incense smoke, or even mist from a spray bottle. With a long shutter, the smoke doesn’t freeze; it flows into soft ribbons that surround the product like misty waves. Similarly, you can pour water slowly near the product and let the long exposure pictures smooth out the ripples. This gives the photo a surreal, atmospheric quality, almost like the product lives in a dream.
Zoom Burst (Camera Movement Trick)
This one doesn’t require moving long exposure photography lights or props at all. Start with your lens zoomed in close to the product. While the shutter is open, gently rotate the zoom ring outwards. The product will remain at the center, but lines will stretch outward like they’re exploding from it. The key here is to move the zoom smoothly so the trails look clean instead of jagged. It’s a way to make even a simple object feel powerful.
Color Layering With Gels
Colored gels are transparent sheets you place over lights. For this technique, pick two or three colored gels and assign each one a light source. During long exposure photography, slowly sweep each colored light across the product in turn. First red, then blue, then green. Because the shutter records everything, the product ends up wrapped in multiple colors that seem layered in time. It’s especially striking on transparent products like glassware or bottles.
Projection Mapping
Not familiar with projection mapping? Consider it like casting images or patterns directly onto an object instead of a flat wall. Set up a small projector in front of your product and play moving visuals, like grids, abstract shapes, or brand logos. With a long exposure, those visuals won’t stay still; they’ll stretch and blend into fluid textures that wrap around the product’s surface. It’s essentially digital light-painting, and it can transform something as simple as a plain box into a piece that looks alive and dynamic, without needing any Photoshop.
Rotating Platform Trick
Put your product on a motorized turntable (or even a lazy Susan you spin by hand). During long-time exposure photography, flash a small light at different intervals. Each flash freezes the product in a slightly new position, so the photo shows several versions of the same product in a circle. It’s a clever way to show multiple angles in one image, almost like capturing time-lapse within a single frame.
Editing Long Exposure Still Life Images
Once you’ve captured your long exposure shot, move on to editing. Start by adjusting the exposure to prevent the product from looking too dark or blown out. Boost the contrast a little to help it pop against the light trails. If you used colorful gels or LEDs, adjust the saturation so the colors look bold but not overwhelming. Got messy streaks? Use masking tools to clean them up while keeping the cool motion effects. Finally, sharpen the product and crop it in tighter if needed. With a few tweaks, your shot will look polished and ready to share.
Conclusion
Long exposure still life photography is both practical and expressive. It can help brands create standout product visuals and give photographers a way to break out of ordinary still shots. With the right approach, patience, and practice, you can consistently produce images that are sharp, professional, visually striking, and memorable. If you’d rather leave the technical side to professionals, Elena Vels Studio specializes in product photography that uses advanced methods to give your products a unique, attention-grabbing look. Get in touch with us today!